Today I’m sharing another sewing pattern with you – my free sleep mask pattern and tutorial so that you can make your own DIY sleeping mask for yourself or as gifts for others!
I created this pattern by holding a piece of paper over my face and marking in key points with a pen onto that piece of paper. It made for an interesting sight I’m sure!
But, I figured for any of my readers who struggle to sleep when the days get longer and the light lingers around for longer, then a sleeping mask pattern would be quite a handy thing.
First things first – grab the free sleep mask pattern right here – and then print it out ready.
Now that you have the pattern, you need to gather the supplies needed (listed below) and then follow along with the sewing tutorial to make your very own sleep mask!
In case you prefer a video to follow along with, I have this video tutorial on how to make the DIY sleep mask pattern on my YouTube channel.


Supplies Needed To Sew The Sleep Mask Pattern
For my sleeping mask, I used:
- Main fabric for the outer and strap
- Silk fabric for the inner which lays upon my face
- Recycled polyester wadding but you could use any type of batting / wadding that you have in your stash that is suitable for you
- Elastic
I ended up making a rouleau strap to keep the sleeping mask in place – purely because I was doubling up the tutorial! – but a narrow type of elastic around 5mm – 8mm wide will work well too!
You can check out the different types of elastic here if you’ve not had much experience with elastics!
Choosing Fabric For Your DIY Sleeping Mask
As you (or the person you intend to gift it to) will be using the sleeping mask over your eyes, I recommend that you use a soft and silk fabric for the interior.
I used a beautiful piece of silk from my stash, and I’m so glad that I did. It doesn’t irritate and feels super luxurious against my eyes.
You can of course use the same silky fabric for for the outer, but I opted to use a 100% piece of cotton leftover from my recently upcycled DIY wrap skirt project. I thought it would be fun to have a print fabric for the exterior, which contrasted nicely with the solid color of the lining.
How To Make A Sleep Mask

Now that you have everything selected lets look at how to make a sleep mask from the pattern!
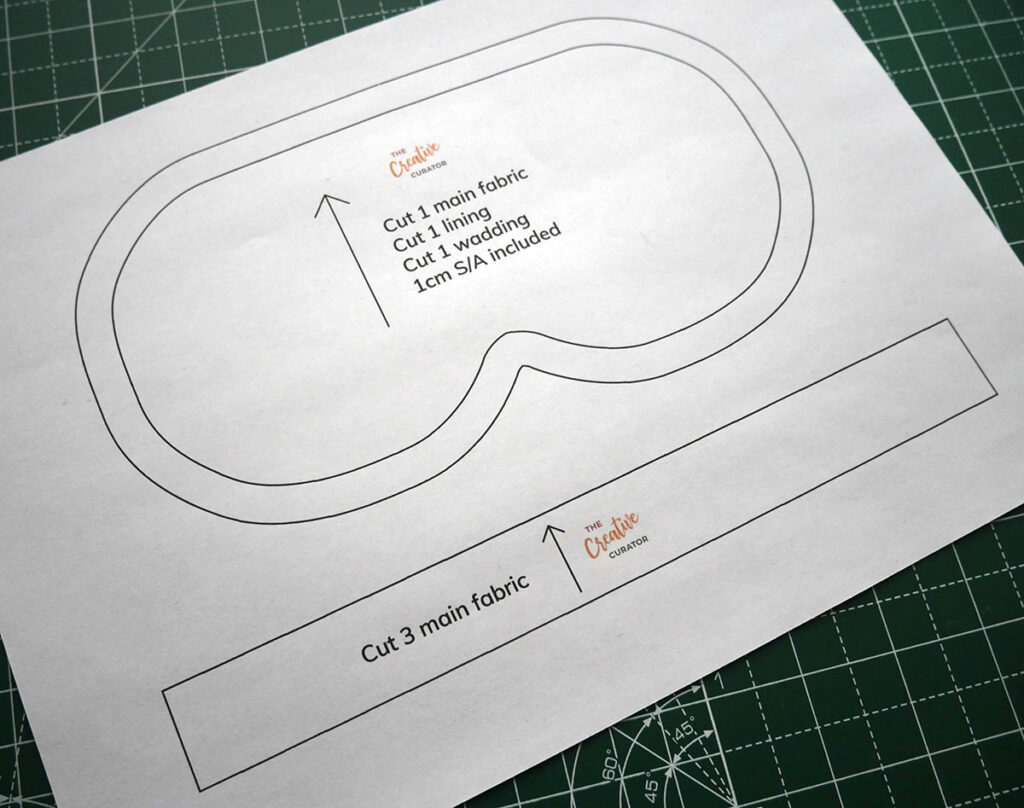
To begin with, you’ll notice that when you print the pattern out there are two lines for the main pattern piece. You can use either of these lines as your ‘cutting line’ – I used the inner line as I wanted my DIY sleep mask to fit snuggly over my eyelids.
Note that both cutting lines have 1cm seam allowance included!
You also need to cut out the strap pattern piece. To fit the paper sizing, I kept it so that you will need to cut three pieces in fabric for the required length.
Step 1: Cut Out Your Main Fabric


Start by cutting out the pattern piece in the main fabric – remember that there is 1cm seam allowance built in, so if you’d prefer to sew with more, this will need to be added on first.
Once your main fabric piece has been cut out, set aside and move onto step 2.
Step 2: Cut Out Your Lining Fabric


If you have chosen to use separate exterior and inner fabrics then you now need to cut out the pattern piece in your chosen ‘lining’ fabric – this is the fabric that will lay on your face when the sleeping mask is worn.
If using a fabric prone to easily fraying – like silk! – then you may want to overlock or zigzag stitch the raw edge to limit how much the fabric frays.
Set aside and move onto step 3!
Step 3: Cut The Wadding


The wadding is the part that will give the sleep mask pattern some ‘depth’ which will help keep the light out.
Place the pattern piece on the wadding and pin carefully before cutting out. I used some basic scissors to prevent any possible damage to my good fabric scissors.
Note that wadding has ‘loft’, which can make it tricky to accurately cut curved pattern pieces out. Do your best, we can trim the wadding down afterwards if needed.


Step 4: Cut The Strap Pieces
Finally we need to cut the fabric pieces for the strap. The pattern contains one rectangle measuring 1″ / 2.5cm by 9 ⅜” / 23.5cm. Cut this out three times and seam each short edge together with a ⅜” / 0.5cm seam allowance as shown in the photo below.


Step 5: Sewing The Outer Fabric To Wadding
Next we need to secure the wadding to the outer fabric. Place the wadding on top of your chosen fabric, and secure with pins.
Note that because of the wadding’s loft, the pins will sink into it – with this in mind, it is better to pin the fabric to the wadding rather than the wadding to the fabric.


Sew with a small seam allowance for this first stage of stitching – I used 5mm and a long stitch length to prevent the wadding from puckering.


Once you have sewn around the entire edge of the sleeping mask, you can then trim the excess wadding away.


Step 6: Sewing The Strap
Before you can attach the lining, you need to sew the strap. You have the three strap sections sewn together to create one long length.
Fold the fabric right sides together along the length, and sew from one end to the other with a 0.5cm seam allowance. This will leave just enough ‘space’ for elastic to be fed through up to 8mm wide. Make sure to cut enough elastic to feel comfy but not tight for your head size.
For my DIY sleeping mask, I made a rouleau strap instead, as I wanted to avoid having elastic across my face.


Step 7: Sewing The Sleeping Mask Lining
Now that the strap is complete, we can sew the lining to the wadding piece.
Place the lining fabric on top of the previously sewn section of your sleep mask. The right side of the silk lining should lay upon the right side of the cotton exterior fabric.


Take the strap and place each of the shorter edges at the centre edge of the sleeping mask as shown in the photo below, and pin in place.


You’ll notice that on the top edge I have an ‘opening’ where the strap is pulled through. The pin is to remind me to not to sew the entire piece closed.
This is what it looks like from the ‘wadding side’!


It’s now safe to sew around the outer edge of the sleeping mask pieces using your chosen seam allowance amount – I included 1cm allowance but you may wish to sew with more or less. Be sure to leave a gap of about two inches to turn everything through!
Step 8: Hand Stitching he Sleeping Mask Closed
Now that everything is stitched in place, you can trim the edges of the strap so that both ends lay flush with the seam allowance. It might also pay to trim more of the wadding away in the seam allowance area is possible.


Carefully turn the mask through, being careful not to cause any fraying of your lining fabric if you didn’t finish the raw edge, and handset the opening closed. You can just see the pin prick stitches from my hand sewing.


The Finished DIY Sleeping Mask
You can see how small the version I made is when laid upon the pattern piece. With the wadding loft being quite high, I lost bout 1.3cm in some places rather than the intended 1cm for seam allowance, so be sure to factor this in when you make your own!


Of course, feeling oh so tired, I thought I should try it on and get some photos for you to see how it came out…


Not only does my finished sleeping mask look awesome, but it is super soft and silky on my face because of the silk that I used from my stash.


Oh, and excuse me while I just have a little snooze during this bright winter day…


It’s just so soft and silky that I couldn’t help but… yawn… 💤💤💤
Watch The DIY Sleep Mask Video Tutorial
As promised, I created a video showing the process. You can now watch my tutorial on making your very own DIY sleeping mask on my personal YouTube channel.
Looking for more free patterns? Check out my tote bag pattern, my free little wallet pattern and this fun faux fur pom pom keychain tutorial makes a great gift ideas too!